How to Install a USB Fast Charger
 An ultra-fast USB charger will keep your devices powered up while on the water.
Jim Hatch
An ultra-fast USB charger will keep your devices powered up while on the water.
Jim Hatch
Mobile devices and laptops go everywhere and serve us well, even on the water. But once the device’s battery dies, we’re at a loss. An onboard USB-style charger is the answer, and if you’re the antsy type who can’t stand to be without a phone, an ultra-fast charger is even better. We found that it’s easy to install aboard a boat a USB fast-charger such as the Scanstrut Flip Pro SC-USB-F.
The Flip Pro offers two ports—a traditional USB-A and the increasingly common USB-C receptacle. This device has proved impressively fast, charging with 36 watts at 12 volts or 60 watts at 24 volts. If you frequently charge larger electronics, opt for the similarly sized Scanstrut Flip Pro Plus (SC-USB-F4) with a Power Delivery chip that’s perfect for charging laptops and large tablets via the USB-C port.
When not in use, the spring-loaded caps on these compact chargers remain tightly closed to protect the ports and electronic circuitry from moisture, spray and enthusiastic washdowns. Both boast an IPx4 waterproof rating. Requiring a 11/8-inch hole (same as with a cigarette-lighter-style power port), they can be mounted at the helm, crew seating area or in a cabin. Switch off the power supply before beginning this project.
Skill Level: 1 of 5
Finish Time: Approx. 2-3 hours
Tools and Supplies- Scanstrut Flip Pro
- Scanstrut Flip Pro Plus
- Power drill and drill-bit set
- 1 1/8-inch hole saw
- One spool each of marine-grade red and black wire
- Inline fuse or circuit breaker
- Marine-grade crimp-on terminals with heat-shrink collars
- Crimping tool
- Electrician’s snake and pull cord
- Wrench set and Phillips screwdriver (for electrical connections)
- Zip ties and zip-tie mounts (to secure wires)
 Avoid areas that regularly receive spray or might be submerged.
Jim Hatch
Select Location
Avoid areas that regularly receive spray or might be submerged.
Jim Hatch
Select Location
Choose a location on the boat that is convenient for items you will want to charge and offers the depth and access behind the mounting surface for cutting the hole, securing the charger with the supplied lock ring, and attaching two wires needed to power it. Even though it carries an IPx4 rating, avoid areas that regularly receive spray or might be submerged such as the transom swim platform. The charger is not approved for engine-room installations. We chose a convenient slightly angled spot on the dash for our charger.
Tip: If you have an existing cigarette-lighter-style power socket that you no longer need or use, you can remove it and use the existing hole to install the Flip Pro.
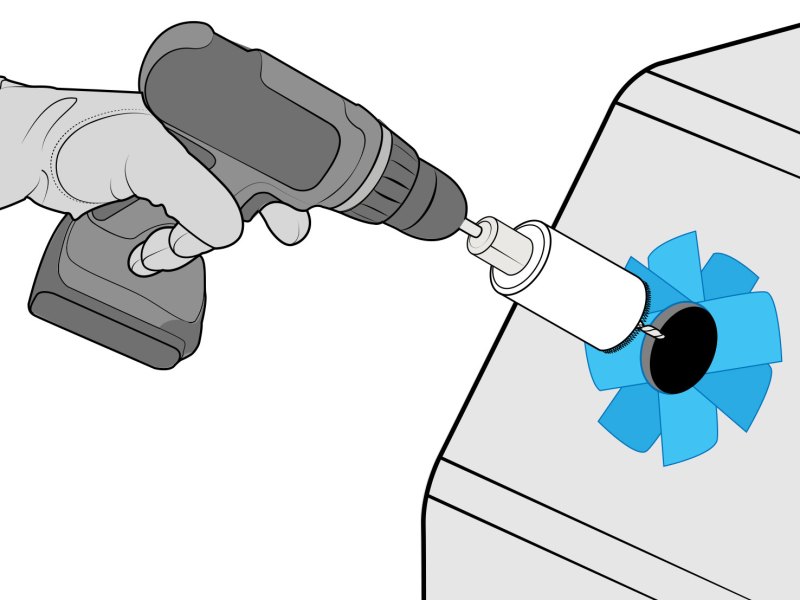 Attach a 1 1/8-inch hole saw to a power drill for making the cut.
Jim Hatch
Cut the Hole
Attach a 1 1/8-inch hole saw to a power drill for making the cut.
Jim Hatch
Cut the Hole
Mask off the area where you plan to cut a hole, and check behind it to ensure it’s clear of wires, hoses and other objects that could be damaged by drilling and cutting. Mark the spot for the cutout with a pencil or marker. Drill a 1/4-inch pilot hole with a power drill at the center of the planned cutout. Next, attach a 1 1/8-inch hole saw to the power drill. Start by running the power drill just until the saw’s teeth contact the surface. Then, run the drill in reverse to etch the cutout; then switch back to forward to carefully complete the cut.
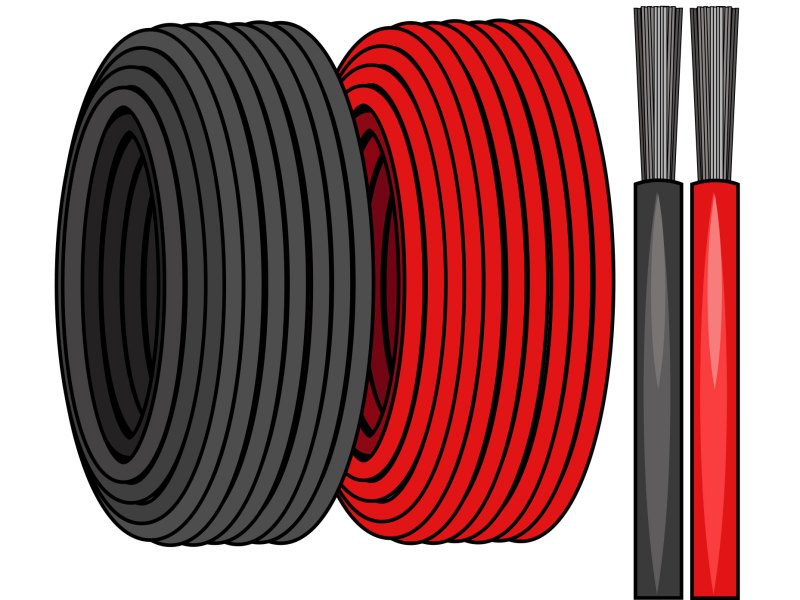 Ensure the wires from the positive power supply and the negative ground are supported through their runs.
Jim Hatch
Route the Wires
Ensure the wires from the positive power supply and the negative ground are supported through their runs.
Jim Hatch
Route the Wires
Each charger requires two wires—red positive and black ground leads. Ensure the wires from the positive power supply and the negative ground are supported through their runs. Select the wire gauge according to the input voltage and current draw for your specific installation. To calculate the appropriate wire gauge for your installation, use the Blue Sea Systems Circuit Wizard at circuitwizard.bluesea.com/#. Be sure to use marine-grade wire or cable that is certified by the American Boat and Yacht Council (ABYC).
Tip: Rather than using two separate wires for the main run, consider using marine duplex cable, which has an additional sheath over a pair of insulated wires.
 Use an ABYC-certified on/off switch to turn on/off power to the charger.
Jim Hatch
Switchable Power
Use an ABYC-certified on/off switch to turn on/off power to the charger.
Jim Hatch
Switchable Power
Use an ABYC-certified on/off switch to turn on/off power to the charger. A fuse or circuit breaker also must be used between the power source and charger. Use the Blue Sea System Circuit Wizard to the determine the fuse/breaker amperage. The charger has two male spade connectors; crimp on compatible female spade terminals to the negative and positive wires. Use marine-grade terminals with heat-shrink collars for water- and corrosion-resistant connections.
Read Next: Installing a DC-to-DC Charger on Your Boat
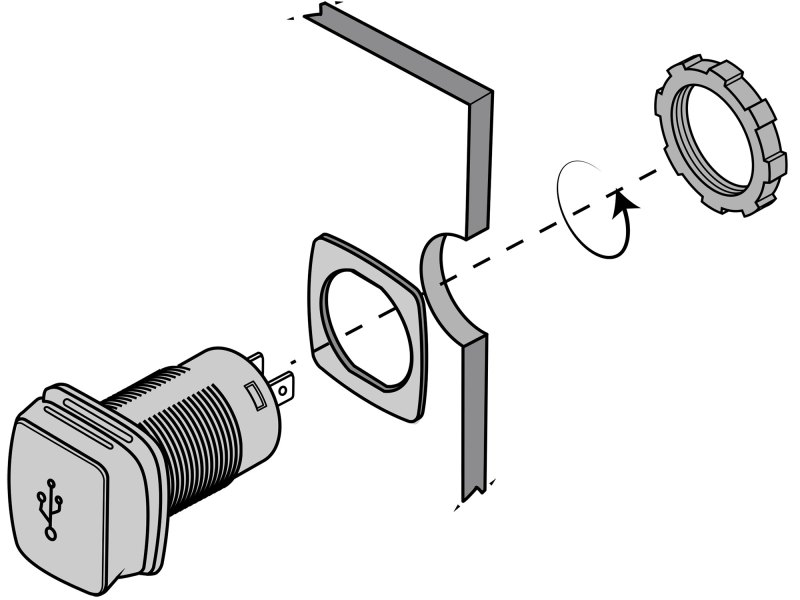 Feed the body of the charger through the supplied gasket and then through the hole you cut.
Jim Hatch
Install the Charger
Feed the body of the charger through the supplied gasket and then through the hole you cut.
Jim Hatch
Install the Charger
Feed the body of the charger through the supplied gasket and then through the hole you cut. Align the face of the charger to suit your particular installation (often with the spring hinge at the top or back). From behind the panel, thread the lock ring and spin it clockwise until it is securely fixed. Plug the wires onto the spade connectors at the back of the charger, ensuring that polarity is correct (red/+, black/-). Switch on the power and use a charging cord with your phone to make sure everything is working.
Bezel Mount: The Flip Pro charger is also available with a front bezel (SC-USB-F2) for cases in which it’s not possible to gain convenient access behind the mounting surface. It has a slightly larger footprint and secures using two self-tapping screws, one on each side of the bezel, but still offers a clean installation.
The post How to Install a USB Fast Charger appeared first on Boating Mag.