Port Tacker’s Guide To The Weather Mark
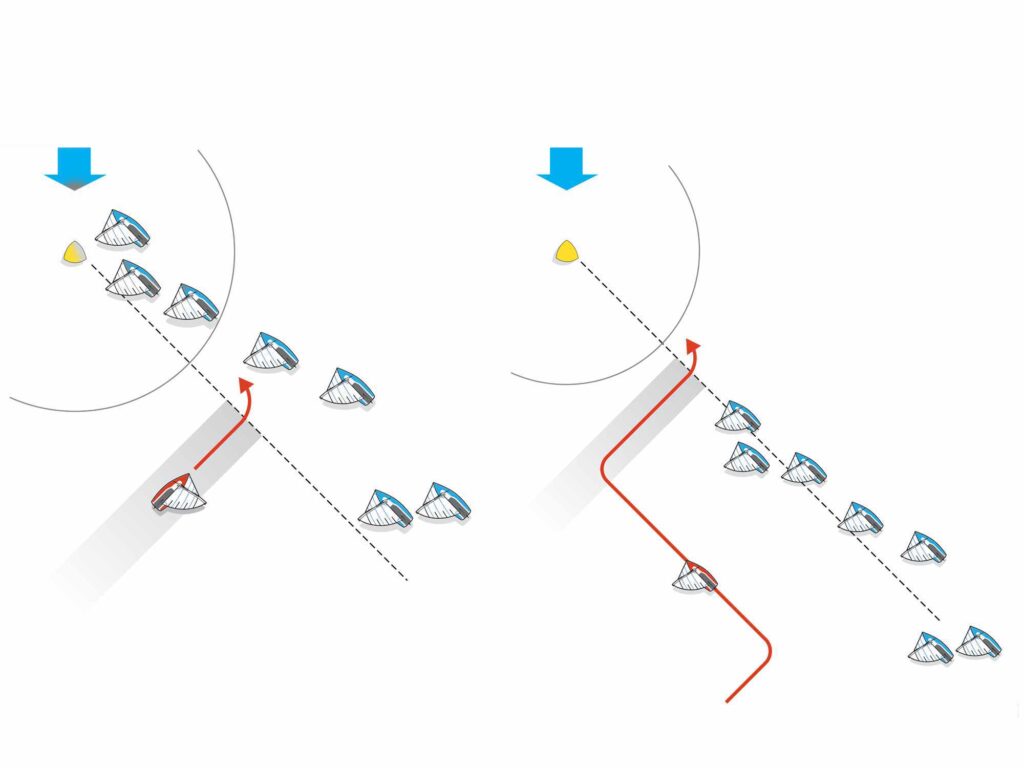 The stress-free and safest port-tack approach (above, at left), aka Tim’s Lane, is a port layline that’s just shy of the three-boatlength mark zone with a tack below any boats that are overstood. Three tacks, versus one tack earlier on the starboard layline, has several advantages. The first tack onto an inside layline keeps you out of the parade of overstood starboard tack boats. The second tack in Tim’s Lane prevents mark rules coming into play, and the third tack shortens the starboard layline, so even if you’re in bad air, it’s short-lived.
Kim Downing Illustrations
The stress-free and safest port-tack approach (above, at left), aka Tim’s Lane, is a port layline that’s just shy of the three-boatlength mark zone with a tack below any boats that are overstood. Three tacks, versus one tack earlier on the starboard layline, has several advantages. The first tack onto an inside layline keeps you out of the parade of overstood starboard tack boats. The second tack in Tim’s Lane prevents mark rules coming into play, and the third tack shortens the starboard layline, so even if you’re in bad air, it’s short-lived.
Kim Downing Illustrations
Many sailors believe that it’s best to avoid the port-tack layline whenever possible, simply because the rules are tricky. More often than not, the port-tacker leaves the protest room disappointed. But that doesn’t mean the port-tack approach is off the table. Top tacticians use it as a way to get a quick jump at the top of the beat. It’s either gain or pain; what’s your preference?
When I think back to all of my riskier weather-mark port-tack approaches, I usually think of gaining nicely on the fleet (happy times), but I recently made a mistake, and the penalty was painful. I’ll also never forget when one of my skippers recently asking me why we don’t approach on the port-tack layline more often. He said that he had seen our competitors taking advantage of it and coming out strong. His question surprised me because most skippers don’t like being guided into the weather mark on port—with no rights and everyone yelling at them not to do it.
When the opportunity does present itself to do so, however, there are a few considerations that will help you get in and out clean and free. First, let’s briefly touch on the rules that come into play when tacking in the zone, keeping in mind that the rules are created to discourage boats from jamming in at the weather mark. We’ve all seen how ugly that gets, especially in big fleets.
If you approach the top of a beat on port tack and inside the three-boatlength mark zone, know that the rules are stacked against you. No one else around? All good. But if there is a starboard-tack boat already in the zone and fetching the mark, you’re not allowed to tack too close. If you do pull off a clean tack, you cannot then force the starboard tacker to sail above a closehauled course.
That second part is what makes it so risky. Even if you pull off a clean tack and they luff above closehauled because they think you were too close, you will most likely lose the protest. There is a nuance of the rule, however. If two boats approach on port tack, inside the zone, and they both tack from port to starboard, it’s OK if the trailing boat has to go above closehauled after the tack because you both have tacked in the zone.
OK, enough of the rules. Let’s get into it.
To help convert your port-tack approaches into gains instead of pain, there are three big considerations. The first is a concept I’ve adopted called “Tim’s Lane.” The second is what I’ll call “Three Versus One.” The third consideration is how to identify when to apply the previous two.
First to Tim’s Lane. I was once fortunate to be on a US Sailing Team conference call led by Tim Wadlow, a two-time Olympian and College Sailor of the Year. He spoke for 45 minutes on this exact topic, and a big takeaway was to approach the weather mark at the 4- to 6-boatlength zone, which takes away any potential rules issues. In Tim’s Lane, there is often space beneath starboard tackers that are overstood. Even if you tack below a few starboard boats in this area, you have only a few lengths to sail in bad air before rounding the mark, which is definitely better than coming in late to a wall of boats.
The Three-Versus-One-Tack philosophy takes into consideration how boats are stacked up on the starboard layline. Imagine a line of boats, all overstanding the mark, hipping up on one another like geese flying south for the winter. That last goose is always way overstood. Tactics 101 tells us that the earlier we get to the starboard-tack layline, the more things can go wrong. If we get headed, we might not lay the mark, and when it later comes time to tack, there’s nowhere to go, so it requires two quick tacks to get around the mark, which is slow. If we get lifted when on starboard-tack layline, we overstand. Finally, if another boat crosses and tacks on you early on the starboard layline, you have a long way to go in bad air with no escape.
The other approach is to plan out three tacks: tacking 50 to 100 meters below the starboard-tack layline, sailing up to the top of the triangle with more options, and then completing two more tacks to get around the mark as you get closer to the mark. I have noticed that the good teams most often opt for the three-tack approach versus one. This is especially true in boats that tack efficiently and quickly. If your boat is slow to tack and accelerate, one tack versus three might be the smarter play.
Because the three-tack option is often best, it’s important to have solid tacks. With great boathandling, you can three-tack without much of a loss. The only downside is that the rules come into play if your third tack ends up being in the zone. The no-stress gain-potential strategy in a big fleet is usually the three-tack approach—putting that second tack into Tim’s Lane.
Are there times when you can approach right on the port-tack layline and actually tack around the mark in the zone? Absolutely. Feel free to do so when you’re in the front of the fleet or in the very back where the traffic is likely clear. Also, sometimes a gap will magically appear, and tacking around is drama-free. These gaps often present themselves at the front of the fleet or on the second lap, when the fleet is more spread out.
In a big fleet, the first weather mark is where port-tack trouble often appears, especially if you are in the middle of the pack. Here, you have to make the difficult decision of when and how to insert yourself into the lineup. Consider traffic density on the starboard-tack layline, and what might happen when other port-tackers eventually come knocking and looking for a hole. When you get to the top of the course, take a good look around for groups of boats and consider how they are all flowing into the top mark from both directions. It helps to visualize this from a drone perspective to picture how everyone will come together.
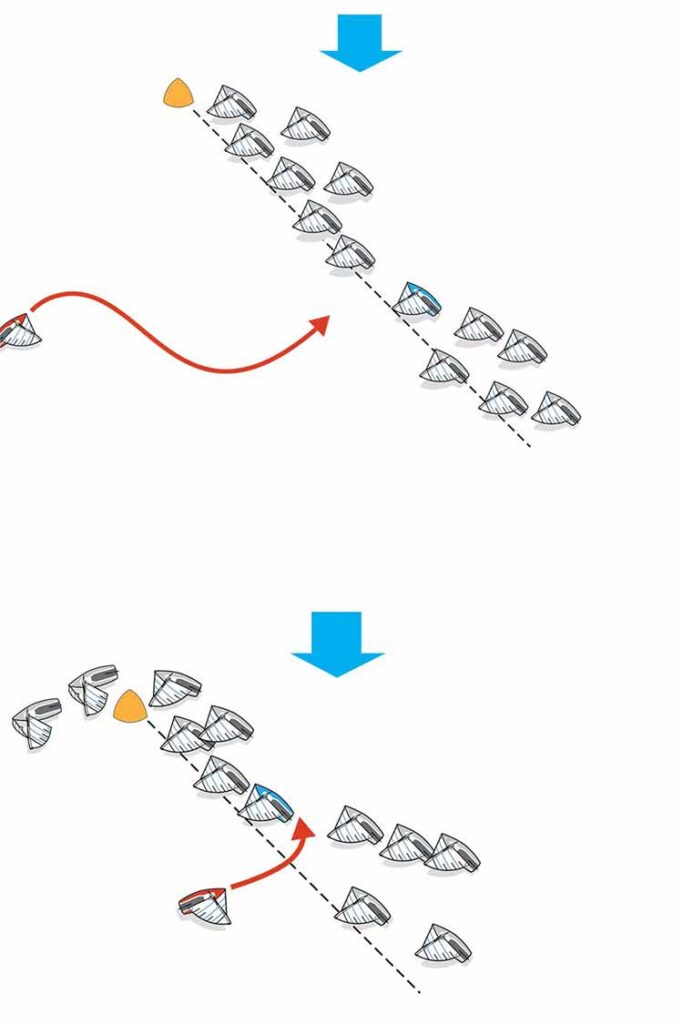 A good move when approaching starboard tackers that are on layline or overstood is to identify the boat that you want to leebow in advance, and bear away early before you get to them. Then, head back up into a nice, safe and smooth high-speed turn into the tack.
Kim Downing Illustrations
A good move when approaching starboard tackers that are on layline or overstood is to identify the boat that you want to leebow in advance, and bear away early before you get to them. Then, head back up into a nice, safe and smooth high-speed turn into the tack.
Kim Downing Illustrations
If you have a few hundred meters to go before getting to the top mark and you tack—let’s say 80 meters below starboard layline—you can look over your shoulder and watch the gains happening as boats stack up and start slowing down one another, pinching, overstanding, and sliding sideways. Typically, any boats that are crossing ahead of you in this situation will continue all the way to the starboard-tack layline, giving you a free lane all the way up the beat. As they drive themselves into the traffic, you can instantly make big gains. The key is to keep monitoring the starboard layline, making your move before it’s too late.
Ultimately, if you find yourself approaching at the top of the beat near the port-tack layline and the nearby starboard layline area looks crowded, the best thing you can do is identify the safest spot to insert, and if it’s back a few boats in the parade, do an early duck and then turn back up so that you are closehauled before you engage the boat you need to leebow.
What often gets people in trouble is sailing to starboard layline, realizing there’s no space, bearing away hard, then sailing downwind looking for an opening. When it does finally come, they have to do a 180-degree turn, which almost always results in a terrible leebow tack or fouling another boat.
The smarter move is to look under the boom, identify the boat that you want to leebow, bear away early before you get to them, and then head back up into a nice, smooth high-speed turn into the tack.
No matter what you do, commit to getting around the weather mark clean, with no penalties, so you can live to make your gains later in the race. A sacrificial duck of a few boatlengths will always be faster than a pair of penalty turns. Plus, you don’t want a reputation as the one who sticks it in at the weather mark every time, causing nothing but pileups and flaring tempers.
The post Port Tacker’s Guide To The Weather Mark appeared first on Sailing World.