How To Tie Leader to Braid
Braided line, sometimes called Spectra or polyethylene (PE) line, is not particularly easy to tie to leader material. Braided lines and fluorocarbon or monofilament leaders seldom play well together with conventional fishing knots designed for mono-to-mono connections. Braided line can slip out of inappropriate knots, at times, because of its small diameter and slick coating. Also, a bulky knot can get caught in the rod tip, leading to catastrophe. Consider these time-tested knots:
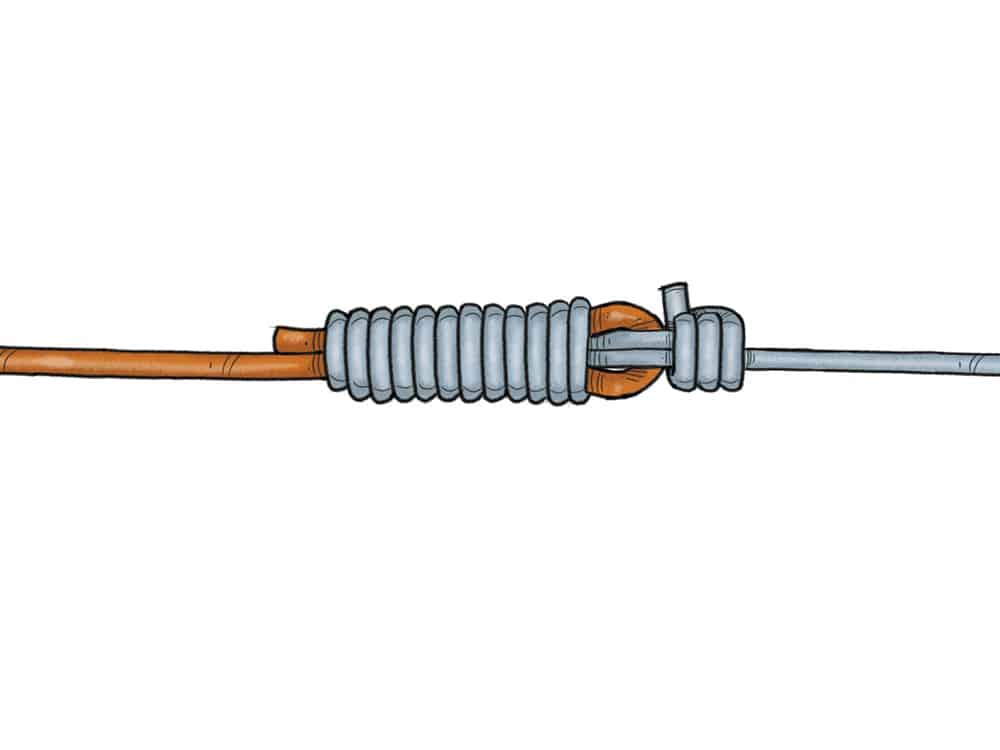
Tying Mono to Braid This secure connection is great for joining mono and braid.
Joe Mahler / www.joemahler.com
Follow these instructions for tying mono to braid with a Albright knot. Strangely enough this connection goes by many different names. There are plenty of variations too. For example, if you make your wraps toward the mainline, you might call it a Bristol knot or Reverse Albright knot. Also, anglers can choose to double-over the main line or leader material when tying this knot, which leads to the wraps being made with the leader material or braided main line. Either way works.
One step farther: Some anglers may to choose to make wraps up and down the knot, and that’s often referred to as the Crazy Alberto or Improved Bristol knot. Don’t get lost in what the name of the knot is called, as long as you can tie it well and it holds strong.
How to Tie the Albright Knot1. Tie a loop in the braid using a surgeon’s end loop, spider hitch or Bimini twist, and lay the leader alongside the loop.
2. Pinch the leader and the end of the loop and wrap the leader around the doubled braid eight times, then bring the tag back through the braid loop.
3. Pull on the braid until the knot tightens and seats. Clip off the tag end of the mono.
The FG knot is best learned from watching a video, not reading written instructions to follow. Capt. Jack Sprengel, a longtime advocate for the FG Knot, dives into the details of this popular line-to-leader knot. Below the video, he details the most important steps to custom-tie his incredibly strong FG knots.
Having been an active angler when the sportfishing community transitioned from monofilament line to braided line, and additionally in the earliest stages of jigging and casting offshore, I have tested every possible knot and leader system out there. Born of Japanese design — but brought to light by a group of extra-sharp Aussie GT anglers — the FG (or “Fine Grip”) knot has forever changed the game of sport fishing. Of every conceivable connection tested to date, no other knot compares to the strength, profile and simplicity of the FG.
That’s right, I just called the FG knot “simple.” Because it is. The FG is a series of half hitches of one line (your braided main line), over another line (your leader). Then a few more hitches up the mainline to create a finish that allows the connection to transition in its profile. It’s literally just a lot of hitches. The catch being that the hitches are alternated creating a process known as “plaiting,” a weaving concept that ultimately forms the same constriction around the leader as a Chinese finger trap. The more you pull, the tighter it holds.
There are many ways to tie this knot such as using an FG tool, or using your hands with a loose wrapping process (sometimes referred to as the “triangle method”). Probably the most popular technique is using your spooled rod-and-reel setup to create mainline tension between the rod tip and your teeth, while weaving your leader with your free hands. For me, I prefer this rod-tension technique. I can tie the knot in the woods alongside a river, or I can rig six big-game popping rods in the dark while on plane heading offshore in search of tuna. The method you chose will most likely be decided by what feels right to you.
Five Tips to Help Tie the FG Knot- Until you build the muscle memory for tying this knot, take your time, keep it clean.
- Once you have woven your alternating over-under wraps (or “initial weave”) around the leader with your mainline — totaling 12 pairs of over-under, or 24 overall — tie one half hitch around the mainline and around the tag end of the leader. Slide it up tight toward the hitches. This locks them in place and allows you to change your grip on the line and leader without compromising the knot.
- Now that you have made that first initial half hitch to hold your weave in place, you must make one critical step. This is when you seat the knot. To do this, take a pair of PE line sticks (or if on a budget, use two dowels covered in tape) and wrap the main line around one and leader around the other. Do this by wrapping from the bottom of each stick up toward the top. It is very important that the line never wraps back over itself, or you will damage your line or leader when pulling. Pull increasingly tighter on the dowels and watch the tension transition all the way down the knot to where the leader exits the braid. You should see the entire knot appear to darken and become shiny in appearance if seated properly.
- Now that you have tied the strength portion of the knot, finish it for more durability when coming out of the rodtip repeatedly when casting. To start your finishing touches, tie a few more of those alternating half hitches that you tied around your leader, alternating over and under until you’ve made about 1/4 of an inch in length of them. If you did this correctly, the knots will all line up nicely instead of spiraling around the line like a traditional floss line finish would.
- From here, cut the end of the leader at a 45-degree angle down toward the mainline. Continue with a few more half hitches to cover the transition area where the leader end lays against the main line. Once only mainline is left, tie a triple hitch and pull it tight.
About 10 years ago while fishing off Cape Cod with my friend Shin, from Japan, he showed me that he tied many more half hitches in his FG knot, essentially doubling the overall length of the knot. Then, he ended with a Rizzuto finish so that the tag end of the knot was buried back inside — like that of a whip finish. The extension of the knot created an extremely durable contact end of the knot that was able to stabilize the transition of the knot from mainline to braid, but also handled significantly more abuse than a traditional FG finish.
I immediately adopted Shin’s finish to my FG technique. At the time I was also becoming a fan of the PR Bobbin Knot for connecting my mainline to leader. It was also low profiled, but incredibly powerful. The only downside being you needed a tool to tie the knot. The reason I mention the PR knot is that I loved the idea of taking a lighter and putting a small stopper mushroom at the knot end of the leader, then completing the finishing half hitches. So I decided to add it to my FG.
I did this where most would cut the leader at an angle and attempt to cover it with hitches. I do the mushroom technique instead — it creates an incredible connection with a “jam” mixed in that will never ever slip. When I tie my first few half hitches, I walk them under the mushroom burr, right up to the knot, and continue to tie them out from underneath the burr and up the mainline until the knot was doubled in overall length from its start. I decided to call this knot a modified FG knot.
Many have poked fun at the knot and said its overkill, but this knot has boated multiple giant tuna for us over 500 pounds on 65-pound class braid. Nothing could ever shake my confidence in either the traditional FG or my modified version. — Capt. Jack Sprengel
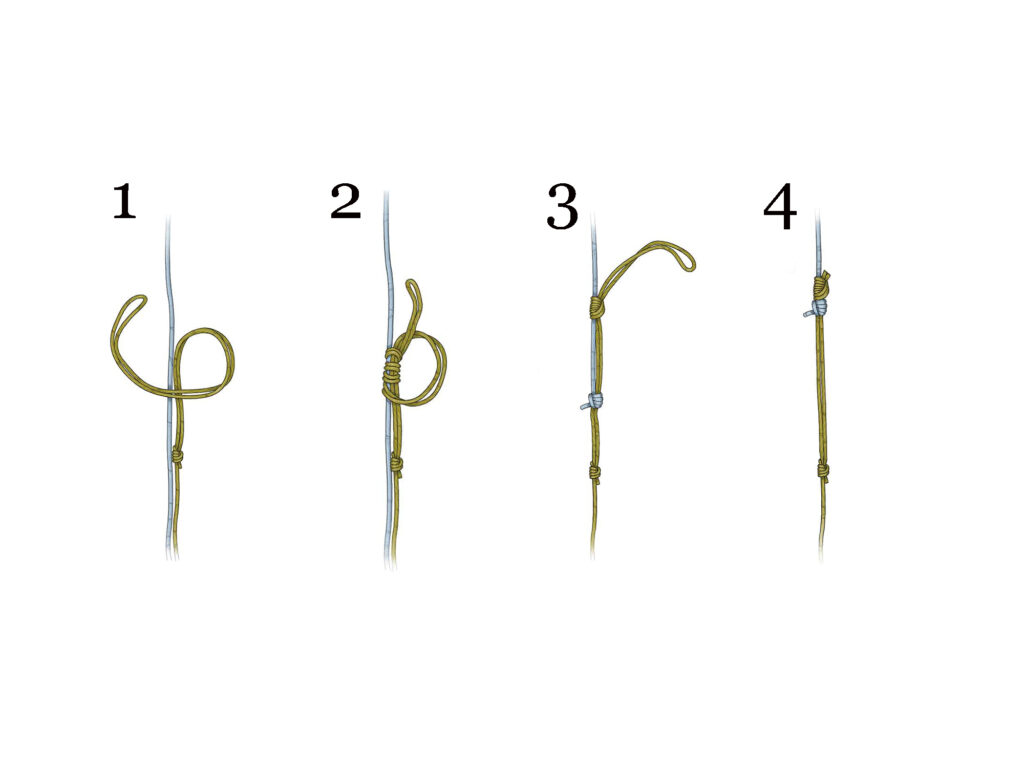
Easiest Line to Leader Connection: Uni to Uni KnotStrong enough to handle most inshore and coastal fish species, the uni-to-uni knot (or sometimes called a double-uni knot) is quick and easy to tie. This line-to-leader connection works exceptionally well with any type of fishing line material. When tying braid to leader, anglers must consider the diameters of each. This knot ties best when diameters of lines are similar, so double the braided main line to double its diameter. See the instructions and easy to follow steps below:
 Joe Mahler / joemahler.com
Easy to Follow Steps
- Lay the doubled main line alongside the leader you wish to attach, then bring it around to form a loop with itself.
- Take five turns with the tag end through the loop.
- Wet the knot and pull the tag end to cinch it down.
- Repeat the knot with the tag-end end of the leader around the main line. Cinch the second knot down, then pull on the leader and main line to slide the knots together to form a “jam” knot.
The post How To Tie Leader to Braid appeared first on Salt Water Sportsman.
- Home
- About Us
- Write For Us / Submit Content
- Advertising And Affiliates
- Feeds And Syndication
- Contact Us
- Login
- Privacy
All Rights Reserved. Copyright , Central Coast Communications, Inc.